Serge van den Oever's weblog
Sitecore SXA cheat sheet
Mon Mar 14 2022 • ☕️☕️☕️ 15 min read • you like my writing? Buy me a coffee
Introduction
Sitecore has traditionally been a very extensible but code-centric platform. Every project consisted of a lot of C# code, MVC code, and Razor views. With Sitecore SXA a large part of the UI related C# code can be replaced by configuration and other types of code:
- Scriban for server-rendered HTML (since version 9.3)
- SASS for styling
- JavaScript/ES6 or TypeScript for the front-end code
While dissecting SXA on my journey to find a way for front-end developer centric Sitecore web-site development I made some notes for myself that might be useful for others as well. Let me know if you see mistakes or have any additions.
Terminology
The Sitecore documentation and the Sitecore UI is not consistent in terminology. I will use the bold terms in this cheat sheet:
- rendering == component == variant
- rendering variant == variant definition
I use the term rendering instance for a rendering added to a page.
In the specified paths in the cheat sheet, I use identifiers for elements in the paths. The following identifiers are used:
<tenant>- the name of the tenant<site>- the name of the site<layer>- the Helix layer:Foundation,FeatureorProject<module>- the name of the module<functionality>- point to a functionality explained in context<rendering category>- grouping name of multiple renderings<rendering>- the name of a rendering<rendering folder>- the name of the folder to organize renderings in
SXA structure
SXA has aconcept of tenants and sites:
- Tentants can optionally be managed in a tenant folder.
- Sites can optionally be managed in a site folder.
Tentant (with all modules selected) has configured on item:
- Templates location -
/sitecore/Templates/Project/<tenant> - Themes location -
/sitecore/Media Library/Themes/<tenant> - Media Library location -
/sitecore/Media Library/Project/<tenant> - Shared Media Library location -
/sitecore/Media Library/Project/<tenant>/shared - Modules - set of selected modules for a tenant, all named
<functionality> Tenant Setup, where <functionality> is one of: Composites, Content Validation, Error Handling, Forms, JSON, Navigation, Redirects, Search, Security, SiteMetadata, StickyNotes, Taxonomy, Editing, Grid, Local Datasources, Multisite, MVC, Presentation, Scaffolding, Theming
Site (with all modules selected) has configured on item:
- Site Media Library -
/sitecore/Media Library/Project/<tenant>/<site> - Themes Folder -
/sitecore/Media Library/Themes/<tenant>/<site> - Modules - set of selected modules for a site, all named
<functionality> Site Setup, where <functionality> is one of: Content Tokens, Creative Exchange, Local Datasources, Overlays, Redirects, Editing, Grid, Multisite, Placeholder Settings, Presentation, Accessibility, Analytics, Compliance, Composites, Context, Engagement, Events, Forms, Generic Meta Rendering, Geospatial, JSON, Layout Services, Maps, Media, Navigation, Page Content, Page Structure, Search, Security, SiteMetadata, Social, StickyNotes, Taxonomy, Search, Theming - Forms folder location -
/sitecore/Forms/<tenant>/<site> - Role domain: TODO what does this
Site has sub-items:
Home- contains site pages +Overlays-> presentation elements in overlay windows-
Media- site-specific media items<site>- ref to/sitecore/Media Library/Project/<tenant>/<site>shared- ref to/sitecore/media library/Project/<tenant>/shared
Data- data sources reusable across multiple pages, organized by rendering type
For each rendering:Insert <rendering>;Insert > <rendering folder>to organize data sources<site> Dictionary- translations for Scriban template ?TODO - what means “template”?Insert > dictionary entry;Insert > dictionary folder-
Presentation- presentation details defined at site levelAvailable Renderings- component categories in Experience Editor toolbox
FieldData:Renderingscontains links to renderings (/sitecore/layout/Renderings/Feature/<module>/<rendering category>/<rendering>)Cache Settings- Set SXA caching options for renderingsInsert > Component Cache Settings- FieldCaching:Renderingcontains renderings to cacheEvent Types- select available event types within event lists ?TODO - from docs, unclear?Insert > Style- FieldsStyle:Value,Style:Allowed Renderings,Style:Verified styleLayout Service- specify additional JSON Rendering VariantsInsert > JSON Rendering Variant Definition- Fields:Page Designs- specify layouts for pagesInsert > Page Design Folder; Insert >Page DesignPartial Designs- specify sets of renderings for consistant styleInsert > Partial Design Folder;Insert > Partial Design;Insert > Metadata Partial DesignPlaceholder Settings- set placeholder restrictions to configure which renderings may go in which placeholdersInsert > Placeholder- FieldsData:Placeholder Key,Allowed Controls, …; InsertPlaceholder Settings FolderPOI Types- configure visualization ofyour points of interest, useful places on a mapInsert > POI Type- Fields:Properties:POI Icon,Styling:Default VariantRendering Variants- renderings (“variant”) with their rendering variant (“variant definition”), variant definitions can be built using ScribanStyles- define preset styles for renderingsInsert > Styles;Insert > Style- Fields:Style:Value,Style:Allowed Renderings
-
Settings- configuration details defined at site levelBrowser Title- variant definition specific for the browser title (defaultTitlefield, can be Scriban)Creative Exchange Storages- export/import options - not relevant!Datasource Configurations- configure datasource options per rendering (override on default)Insert > Datasource Configuration- Fields:Datasource configuration:Datasource Roots Locations, …Default links- configurations for the link renderingFacets- configure facets used by the search componentsHTML Snippets- meta component that you can add to theMetadata Partial DesignInsert > HTML Snippet- Fields:HTML Snippet:Html; InsertHTML Snippet FolderItem Queries- Create custom queries for list componentsInsert > Query- Fields:Query:Query,Rules:Filtering rules ...;Insert > Item Queries FolderMaps Provider- store maps authorization keyPrivacy Warning- configure the privacy warningRedirect- add redirect mappings between old and new url’s (may use wildcards)Insert > Redirect Map;Insert > Redirect MapGroupingScopes- add search scopes with boosting rulesInsert > Scope- Fields:Scope:Scope Query,Boosting:Rule;Insert > Scopes FolderShared Sites Settings- configure Delegated Areas to share pages, content, presentation and data sources between sites in same tenantSite Grouping- manage Sitecore site definitions using the SXA Site Manager. Can also add custom providers and assign login pageSocial Media Groups- manage social media buttons and their code snippetsInsert > Social Media ButtonsTwitter Apps- Configure Twitter credentialsInsert > Twitter App- Fields:Application:Consumer Key,Application:Consumer Secret, …
Setting up a new tenant and site
A new tenant… TODO
New tenant
New tenant creates template folder /sitecore/Templates/Project/<tenant> with sub-items specifying the selected base templates (Field: Data:Base template):
Home- Page, HomePage- Page, _HasValidUrlName, _Navigable, _Page Search Scope, _Searchable, _Custom Metadata, _OpenGraph Metadata, _Seo Metadata, _Sitemap, _Twitter Metadata, _Sticky Note, _Taggable, _Local Data Link, _Designable, _StyleablePage Design- Page Design, _Sticky Note, _Page Design ThemePage Design Folder- Page Design FolderPage Designs- Page Designs, _Asset Optimization, _Site ThemePartial Design- Partial Design, _Sticky NotePartial Design Folder- Partial Design FolderPartial Designs- Partial DesignsSettings- Settings, _Composite Theme, _Error Handling, _Search Criteria, _Favicon, _Robots Content, _SitemapSettings, _Datasource Behaviour, _Editing Theme, _Grid Mapping, _CustomRenderingViewPath, _Compatible themesSite- Site, _Forms Folder Location, _Role Domain, _ModulesTenant- Tenant, _Forms Folder Location, _Role Domain, _Modules
New site
TODO
A site and its theme
When a site has no theme assigned it will fall back to the Wireframe theme.
Assign theme:
- Experience Editor: select Experience Accelerator tab, click Theme, select for Default the required theme
- Content Editor: On
/sitecore/content/<tenant>/<site>/Presentation/Page Designs- fieldStyling:Themeset value ofDefaultto the required theme. It is also possible to create additional values
If your theme styles and scripts are preoptimized (advised - use SXA Umbrella), set on /sitecore/content/<tenant>/<site>/Presentation/Page Designs:
- field
Asset Optimization: Styles Optimizing EnabledtoNo - field
Asset Optimization: Scripts Optimizing EnabledtoNo
on /sitecore/content/<tenant>/<site>/Presentation/Page Designs - field Designing:Template to Design Mapping [TODO]
Extending SXA
Create SXA extensions in the /sitecore/Templates folder using custom items outside standard SXA sections.
SXA follows the Sitecore Helix solution architecture, a set of conventions used in Sitecore applications to provide a modular architecture which helps you manage dependencies. In this solution architecture Sitecore Helix defines three layers:
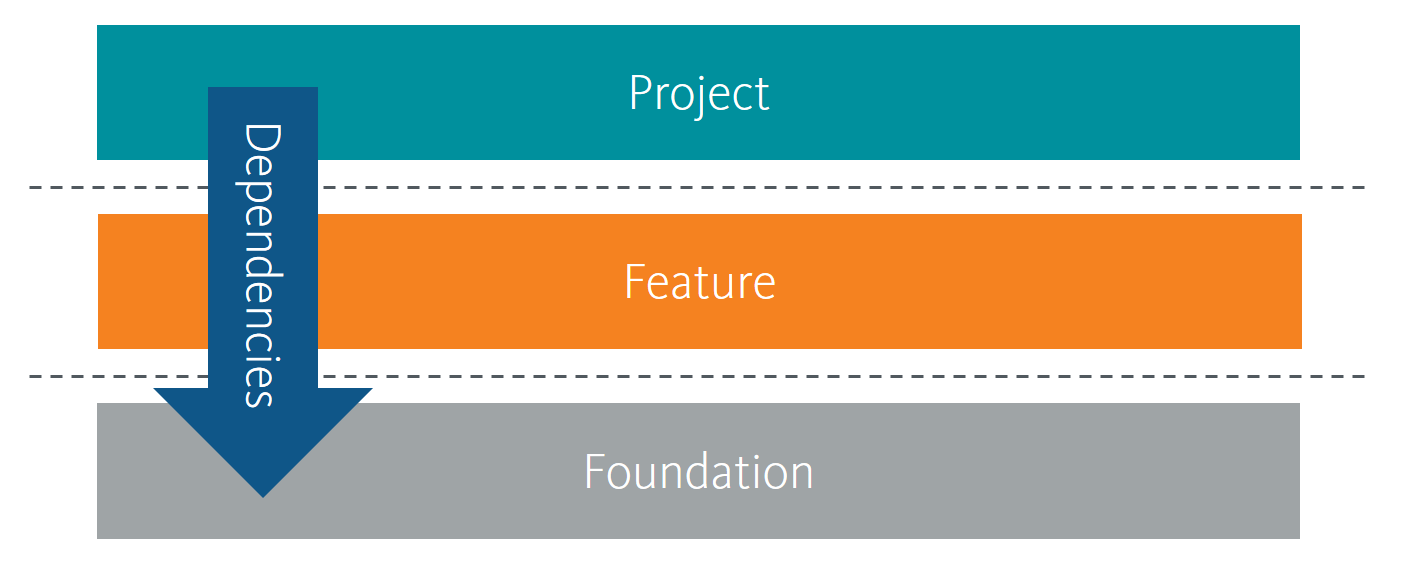
Those layers you will find back in everything Sitecore does, that is why you see folders named:
- foundation - base logic shared by multiple features
- feature - concrete features as understood by business owners and editors
- project - context of the solution
Create a new module
A module is selectable when scaffolding a new tenant or site (or can be added afterward). A module is also required to add new renderings.
Module can be created at tenant and/or site level.
Based on Helix layer structure create a new module using Insert > Module at one of the following layers:
- Foundation -
/sitecore/System/Settings/Foundation - Feature -
/sitecore/System/Settings/Feature - Project -
/sitecore/System/Settings/Project
Initially select all system areas for which container folders should be created:
- Templates -
/sitecore/templates/<layer>/<module> - Branches -
/sitecore/templates/branches/<layer>/<module> -
Settings -
/sitecore/system/settings/<layer>/<module>with- sub-item
<module> site setupfor site setup Add Available Renderings- template: AddItemAdd <rendering>s Data Item- template: AddItem (for each rendering)-
Rendering Variants(folder)<rendering>- template: AddItem (for each rendering)
- sub-item
<module> tenant setupfor tenant setup - …
- sub-item
- Renderings -
/sitecore/layout/renderings/<layer>/<module> - Placeholder Settings -
/sitecore/layout/placeholder settings/<layer>/<module> - Layouts -
/sitecore/layout/layouts/<layer>/<module> - Media Library -
/sitecore/media library/<layer>/<module>
Create a new rendering
Considerations for new rendering: Rendering Parameters vs Data Source - can be used together
-
Rendering Parameters:
- template for data -
/sitecore/templates/<layer>/<module>/Rendering Parameters/<rendering> - for configuration specific for rendering instance
- edit through “Edit component properties”, editing in context (overlay)
- no extra item to be published
- template for data -
-
Data Source:
- template for data -
/sitecore/templates/<layer>/<module>/<rendering> - data in a completely separate item (must be published as well)
- edit through “Edit the related item”, editing in Content Editor
- inline editing in Experience Editor (if wanted)
- for content, supporting multiple language versions
- reusable over multiple rendering instances on multiple pages
- supports personalization and A/B testing
- template for data -
New rendering can be created in two ways:
- On
/sitecore/Layout/Renderings/<layer>/<module>selectInsert > Componentto start a wizard to create a new component (no further details - a lot of manual configuration) - Clone an existing rendering - preferred approach, and described below
Clone a rendering
If you need a rendering with Rendering Parameters & Data Source:
- clone the Promo rendering
/sitecore/layout/Renderings/Feature/Experience Accelerator/Page Content/PromousingScripts > Clone Rendering
If you need a rendering with Rendering Parameters only:
- clone the Page Content rendering
/sitecore/layout/Renderings/Feature/Experience Accelerator/Page Content/Page ContentusingScripts > Clone Rendering
In the Clone rendering wizard make the following selections:
GENERAL tab:
- New rendering name:
<rendering> - Add to module:
<layer>/<module>(use module created above) - Rendering CSS class:
<rendering>- this is the class name used to identify the rendering
PARAMETERS tab:
- Rendering Parameters:
Make a copy of original rendering parameters
DATASOURCE tab:
- Datasource:
Make a copy of original datasource(empty for Page Content rendering)
VIEW tab:
On the view tab we have two approaches:
- stay with the use of the original MVC view file (
~/Views/Variants/Page Content.cshtmlor~/Views/Variants/Promo.cshtml) - have custom view files for Rendering Parameters & Data Source or Rendering Parameters only
The second approach is our preference, because it is cleaner. The only difference is that the original MVC view files have a default class (content or promo) if no override is given in the GENERAL tab.
Given the second approach specify the following arguments on the View tab:
- View:
Select existing MVC view file (specify path below) - Path to rendering view:
~/DMPViews/Views/Variants/GenericParametersAndDataSource.cshtmlor~/DMPViews/Views/Variants/GenericParameters.cshtml
The views are located at c:\inetpub\wwwroot\<sitecore webroot>\DMPViews\Views\Variants\ and have the following content:
~/DMPViews/Views/Variants/GenericParametersAndDataSource.cshtml (derived from the Promo view file ~/Views/Variants/Promo.cshtml):
@using Sitecore.XA.Foundation.MarkupDecorator.Extensions
@using Sitecore.XA.Foundation.RenderingVariants.Extensions
@using Sitecore.XA.Foundation.RenderingVariants.Fields
@using Sitecore.XA.Foundation.SitecoreExtensions.Extensions
@using Sitecore.XA.Foundation.Variants.Abstractions.Fields
@model Sitecore.XA.Foundation.Variants.Abstractions.Models.VariantsRenderingModel

@if (Model.DataSourceItem != null || Html.Sxa().IsEdit)
{
    <div @Html.Sxa().Component(Model.Rendering.RenderingCssClass ?? "", Model.Attributes)>
        <div class="component-content">
            @if(Model.DataSourceItem == null)
            {
                @Model.MessageIsEmpty
            }
            else
            {
                foreach (BaseVariantField variantField in Model.VariantFields)
                {
                    @Html.RenderingVariants().RenderVariant(variantField, Model.Item, Model.RenderingWebEditingParams, Model)
                }
            }
        </div>
    </div>
}
~/DMPViews/Views/Variants/GenericParameters.cshtml (derived from the Page Content view file ~/Views/Variants/Page Content.cshtml):
@using Sitecore.XA.Foundation.MarkupDecorator.Extensions
@using Sitecore.XA.Foundation.RenderingVariants.Extensions
@using Sitecore.XA.Foundation.RenderingVariants.Fields
@using Sitecore.XA.Foundation.SitecoreExtensions.Extensions
@using Sitecore.XA.Foundation.Variants.Abstractions.Fields

@model Sitecore.XA.Foundation.Variants.Abstractions.Models.VariantsRenderingModel

<div @Html.Sxa().Component(Model.Rendering.RenderingCssClass ?? "", Model.Attributes)>
    <div class="component-content">
        @if (Model.Item != null)
        {
            foreach (BaseVariantField variantField in Model.VariantFields)
            {
                @Html.RenderingVariants().RenderVariant(variantField, Model.Item, Model.RenderingWebEditingParams, Model)
            }
        }
    </div>
</div>
The following items are created for the new rendering:
/sitecore/layout/renderings/<layer>/<module>/<rendering>/sitecore/templates/<layer>/<module>/rendering parameters/<rendering>- defines the rendering parameters, use Builder tab for defining sections and fields. When using theDMP Bootstrap 4grid by Barend Emmerzaal no Grid Parameters are required, and on this item the Grid Parameters template can be removed from theBase templateto optimize the UI in the Edit component properties functionality accessible on a rendering in the Experience Editor/sitecore/system/settings/<layer>/<module>/<module> site setup/rendering variants/<rendering>/sitecore/system/settings/<layer>/<module>/<module> site setup/add <rendering>s data item- `/sitecore/templates/branches/
/ /default variant
When cloning the Promo rendering (to get both Rendering Parameters & Data Source) we also get the item:
/sitecore/templates/<layer>/<module>/<rendering>- defines the parameters in the data source, use Builder tab for defining sections and fields/sitecore/templates/<layer>/<module>/<rendering> folder- template for the folder/sitecore/content/<tenant>/<site>/Data/<rendering>to hold the data sources for this type or renderings
Add rendering to toolbox
The Experience Editor contains a toolbox with the available renderings organized in sections. The sections and their renderings are managed per site at the following location /sitecore/content/<tenant>/<site>/Presentation/Available Renderings. Use Insert > Available Renderings to create a new section. On a section edit the field Data:Renderings to add/remove renderings in the section.
Add data folder for rendering data sources
On /sitecore/content/<layer>/<module> select Insert > Insert from template to create a new data folder for items for your new component.
Discuss on Twitter • Edit on GitHub
This work is licensed under a Creative Commons Attribution-NonCommercial 4.0 International License. You are free to share and adapt this work for non-commercial purposes, provided you give appropriate credit, provide a link to the license, and indicate if changes were made. To view a copy of this license, visit http://creativecommons.org/licenses/by-nc/4.0/.
Serge van den Oever's weblog

Personal blog by Serge van den Oever - als je maar lol hebt...
X: @svdoever
LinkedIn: Serge van den Oever - articles on LinkedIn
GitHub: svdoever
Technology Consultant @ Macaw
2021-2024 Sitecore Technology MVP